In my eleven years of student robotics competition experience, I've seen many, many teams make the same unrecoverable mistake over and over - working like crazy on the robot until the last minute before an event without spending much time practicing to play the competitive game well. The result of getting too geeked out on the technology like this nearly always results in a robot and a team that underachieves in competition. I'm determined not to let that happen to the Robobraves in our rookie VRC season. So, armed with that idea, along with our fully functional drivetrain and a clear plan for iteration 1.0 of a single-jointed arm accumulator that reaches all goal heights (see previous blog entries for details), we began dividing and conquering at Tuesday's meeting.
Half of the team, with clear instructions, began driver practice with the drivetrain while the other half set to work on the arm hypotenuse. Half way through the meeting, the groups switched giving all present team members some experience measuring, cutting, filing, assembling, and applying corresponding safety procedures as well as simulating what play might me like in the Gateway interaction zone in a two-minute time period - moving toward goals, avoiding an opponent robot, delivering game objects and taking clear instructions from an on-field coach.
During both activities, professionalism was stressed - measuring carefully, cutting straight, not over filing, knowing the value of keeping everything straight and square, using the safety glasses as necessary, moving as efficiently as possible with the drivetrain while simulating game conditions, getting to know how to slide, spin, and turn the robot to take full advantage of the drivetrain attributes this robot possesses.
We've got a long way to go, but by meeting's end the team had a better sense of the drivetrain, playing in the interaction zone, operating from the player station, thinking about efficient and effective movements as well as having improved just a little with our manufacturing and assembly skills.
On the surface, it looked like not much happened at today's meeting, but in reality, this was really our most important step thus far. Look for all meetings from here forward to include some kind of driver practice as the relationship between man and machine both off and on the field of play is critical to team success.
Meeting photos, here and as always, learn more about our parent organization, Upper Perk Robotics at uprobotics.org
-Kressly
Wednesday, July 13, 2011
Friday, July 8, 2011
iterations and calculations ... 7/5 and 7/8 meetings
The 7/5 meeting time was eaten up with drivetrain iterations. We were unhappy with the fact out two stacked center/sideways wheels weren't always contacting the field tiles. However, the field tiles were laid on top of overlapping carpet remnants, thus the first order of business was to yank/roll up the offending carpet and lay the field tiles flat on the floor so we could retest the drivetrain to see it we "really" had an issue. Sure enough, the sideways wheels still weren't performing as desired because...
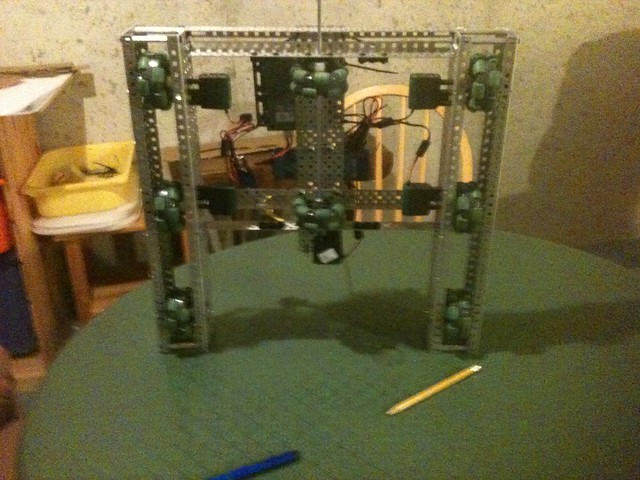
b. my basement floor isn't totally levelWe retested one more time, taking closer looks at everythnig and concluded that both a AND b were the culprits. However, we also concluded, that ANY floor we compete out could be less than level, so after flushing the rails we also went through three more iterations of the center/sideways wheel layout. v1.1 we split the wheels across the horizontal of the drivetrain using three gears and the same single motor. Results were somewhere between "no change" and "worse." v1.2 we went back to the stacked single shaft for both of these wheels, spreading a greater front to back distance between the two center sideways wheels. We liked these results but felt we could do even better with a longer spread between the two rails, thus we landed on v1.3 (as seen below) which, by far, tested the best! We'll keep it this way to practice and only tweak if performance worsens with wheel wear and addition of object manipulator(s).
So, with those additional (and much needed) drivetrain iterations, we were out of time to begin manipulator discussions an calculations. Thus, our July 8 meeting held three agenda items:
1. Trim shaft to size for for v1.3 of our drivetrain
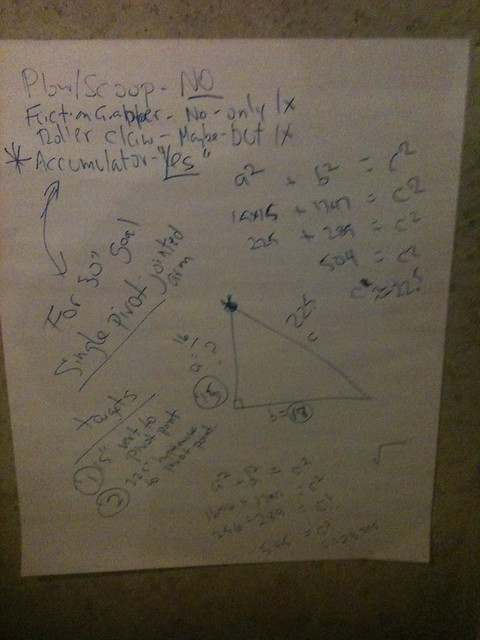
2. Use Pythagorean Theorem and cardboard lengths to plan for a single jointed arm with the lowest possible pivot point (to keep COG down) that could reach well over the 30" goal (33" to 34" should give use the clearance we desire).
3. Learn about the basic types of robotic object manipulators and decide what our best option would be.
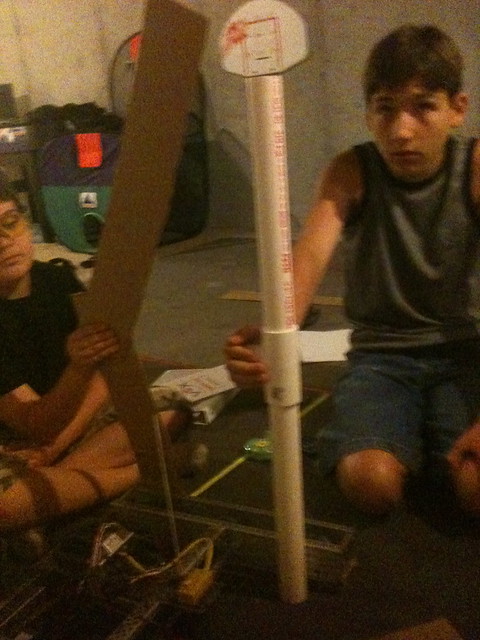
We got right to business as the first two Robograves arrived and too care of item 1 in short order. All attending also learned a little about cutting and filing efficiently and safely. For item 2 we assembled with notebooks, calculators, our theorem, cardboard strips of varied lengths we cut last time, and a loose piece of shaft. After reviewing the theorem, doing a few iterations of math in notebooks and on our chart paper, then testing it out with our cardboard and shaft, we were able to set our target arm distances of 15" vertically from the floor to the pivot point and approximately 22.5" from tip of manipulator to the pivot point (hypotenuse of the triangle). Here's part of the process:
To complete item 3 on the agenda, we reviewed definitions and examples of different types of robotic object manipulators, then applied the knowledge to the Gateway game and our agreed upon manipulator priorities to conclude our most desired manipulator was an accumulator of some kind. So all together we can safely say, we now would optimally like a single jointed arm that elevated and lowers an accumulator.
So, we concluded our meeting researching internet video of past VEX competitions that had single jointed arm accumulators to get ideas. We learned a lot by doing this including Bryan's revelation of, "It's best to look for finals matches at events because they are the best robots ... and they are almost ALL accumulators!" This was excellent validation for a team that hasn't "been there" or "done that" ... yet!
With our agenda items taken care of there was even time left for our two video research groups to sketch some ideas for what our arm/manipulator might look like and make very detailed engineering notebook entries for the day.
I like the way our team is starting to come together and looking forward to beginning our manipulator build.
Until next time,
Kressly
Thursday, June 23, 2011
We got ourselves a robot....
After wiring and electronics mounting, 1414 went live with drivetrain bench and field testing today. We're thrilled that all of our four priority criteria for our drivetrain were at least partially, if not fully met in v1.0!
Video of first bench test:
http://www.youtube.com/uprobotics#p/a/u/0/L-QsAbyEWws
Video of field testing:
http://www.youtube.com/uprobotics#p/a/u/1/jfmh34Dwf6M
After testing our meeting concluded with notebook entries, a quick tutorial on the Pythagorean Theorem, and a homework assignment to use the theorem to figure out dimensions for a one jointed arm to reach over the 30" goal (we figure 34" will be a safe height given the diameter of objects) with the lowest pivot point possible. Thus, our next meeting will include manipulator design work along with a few slight alterations to our drivetrain based on testing.
Meeting photos are here:
http://www.flickr.com/photos/uprobotics/sets/72157627031284576/
Tuesday, June 21, 2011
lemon squares, chocolate chip cookies, and a completed chassis
Snacks are a key element to any team meeting and I'd like to thank team member and parents for stepping forward and providing snacks during meetings - it's very much appreciated.
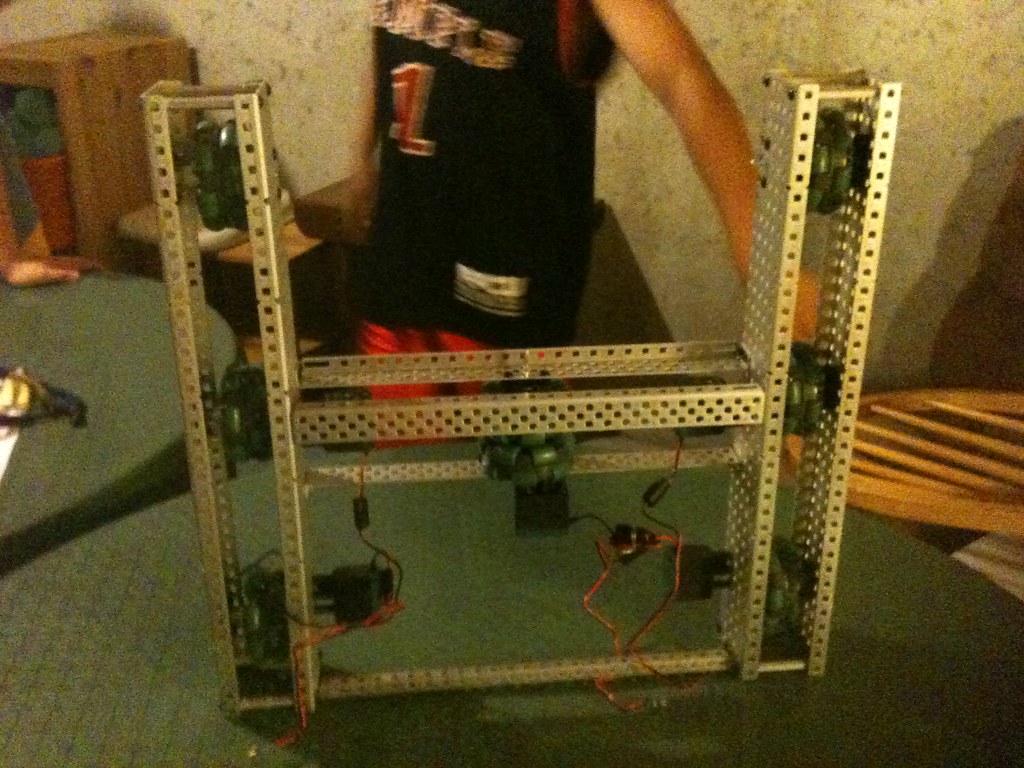
Today was dedicated to bringing team members who were absent last meeting up to speed and then we focused on completing assembly of our drivetrain and chassis v1.0. Reversing those backwards rivets (woooooopsie, Kressly) was the first order of business, then mounting motors, integrating the two wheel channels, then lastly installing two center sideways omni-wheels (thanks again FRC/VRC 148) to complete the initial design. Along the way we made little adjustments to position of shaft collars and spacers (a practice we need to continue next time) to allow for more modular and quicker dis- and reassembly.
Here's the product of our labors:

More pictures from the meeting are here
Does this drivetrain and chassis meet our brainstormed priority criteria of: 1. omni-directional, 2. robust, 3. zero turning radius, and 4. quick ???? That's what we should learn at our next meeting when we add a microcontroller and fire up a live VRC 1414 robot for the very first time on Thursday. I can't wait ... stay tuned!
-kressly
Today was dedicated to bringing team members who were absent last meeting up to speed and then we focused on completing assembly of our drivetrain and chassis v1.0. Reversing those backwards rivets (woooooopsie, Kressly) was the first order of business, then mounting motors, integrating the two wheel channels, then lastly installing two center sideways omni-wheels (thanks again FRC/VRC 148) to complete the initial design. Along the way we made little adjustments to position of shaft collars and spacers (a practice we need to continue next time) to allow for more modular and quicker dis- and reassembly.
Here's the product of our labors:
More pictures from the meeting are here
Does this drivetrain and chassis meet our brainstormed priority criteria of: 1. omni-directional, 2. robust, 3. zero turning radius, and 4. quick ???? That's what we should learn at our next meeting when we add a microcontroller and fire up a live VRC 1414 robot for the very first time on Thursday. I can't wait ... stay tuned!
-kressly
Tuesday, June 14, 2011
The rivets go in which way?
Very belated and brief entry here for our June 7, 2011 meeting. The meeting was very focused an on track with 3 major agenda items:
1. Finish our brainstorm "what" lists and prioritize items,
2. Review related vocab and get to know the tools.
3. Begin building drivetrain.
Building on our "Stubots" experience from the last meeting, we were able to accomplish all three. Photos are here.
Note: We didn't get as far with our drivetrain build as we'd have liked before meeting time ended. The conversation went something like this...
Team member(s): "Mr. Kressly these rivets keep falling out. They don't hold."
Kressly, "Yes they do. You must not be pushing them all the way in."
Other team members: "These rivets stink! They don't work!"
Kressly: "Yes, they do! Is the robot done yet? What's taking so long?"
-Meeting adjourned. I look closer at the student work after team members depart and discover I taught them to put the rivets in backwards. Whoops! Guess we'll be switching those next meeting and I'll be doing push ups or finding another way to make up for the time-wasting screw up.
Finished drivetrain next meeting... I promise (I think) :-)
-Kressly
Wednesday, June 1, 2011
The best laid schemes o' mice an' men ...
5.31.11: As Robert Burns once wrote, "The best laid schemes o' mice an' men gang aft agley." If you compare this post to our last one, you'll see I'm a liar 3 or 4 times over.
In the last post I promised at this second meeting we would, "concentrate on the brainstorming process, learn about our tools, learn gear ratio, and do some more in depth work with our vocabulary and design notebooks. Look for the student team members to take over and rotate into blog entry duty starting at the next meeting. Getting everyone's perspective here should be a lot of fun."
It's amazing how fast two hours go when a group is thoroughly engaged. That tidbit plus the fact that, even as a teacher of 18 years, I can be a lousy predictor of time needs for the group collectively forced us to adjust the agenda on the go. So, you WON'T find student team members writing blog entries yet (perhaps that will begin after the school year concludes), nor will you read about tools, gear ratios, or in-depth vocabulary work (all of those to take place at meetings in the future).
You WILL, however, hear about our work with the brainstorming process and our design notebooks. Since the "homework" given at the conclusion of meeting one was to read the Gateway rule book, the basic flow of the meeting went like this:
1. Close, group reading of the Gateway game rules along with Q&A for clarification. Here the six team members and I took turns reading this section of the manual until we had a really good understanding of the game. We referred our field mock up and game objects from time to time as needed. For reference, the rule book and corresponding info is found here.
2. Next, our team members played a few rounds of "Stubots" to better display an understanding of the game and its potential strategies. This is an excellent interactive (and fun) way for team members to better understand a robotics competition game and the rules prior to brainstorming for a solution. Special thanks to FRC team 116 in Herndon, VA for the idea. They've been playing "Stubots" for years as an early part of the competition robot development process. As the team played each round their rules understanding and game strategies became more sophisticated. Understanding that corner goal scoring is easily "descored" and that there is value in "handing off" game objects from the interaction zone to the isolation zone are two items that pop into mind quickly. Three short videos of this part of the process can be found on the UPR Youtube Channel:
http://www.youtube.com/uprobotics#p/a/u/0/lHSSlXj25zI
http://www.youtube.com/uprobotics#p/a/u/1/Rb7w6o_loPk
http://www.youtube.com/uprobotics#p/a/u/2/ZdMuD0ojQ88
3. After Stubots we began the brainstorming process. First, as individuals, team members listed all of the autonomous and tele-op strategies they could think of. Then, in small groups they combined their lists and presented the combined lists to the whole team. This set of lists was posted on our meeting room wall. Next, as time was running out in the meeting, we began our focus on the "what" of the game ... as in, "What do you want to be able to do?" not "HOW" or pictures or anything else. Team members started making their individual "what" lists and shared out verbally what they had on them. While this is still a work in progress, it already seems all team members are in favor of a robot that is quick, agile, maneuverable, potentially omni-directional that is able to score in all goals on the field.
4. The last part of the meeting was students making their engineering notebook entries (define problem-->list task(s)-->reflect/evaluate). All students wrote about the problem of understanding the game and its rules along with the problem of what to build to play the game. The reflective process that takes place here is a favorite of mine as, over time, it will mark real growth and learning, and will eventually prevent us from repeating mistakes - even in future years.
In all, a great meeting. Pictures from this meeting, and other UPR meetings/events can be found on our Flickr account, here. Thanks to Mrs. Meyer for the donuts, LMHS and Bob Foreman for the field tiles, and Mrs. Smith for doing some photography/video. Homework for our next meeting includes re-reading robot rules, finishing off individual "what" lists, and reading/signing up for the VEX forum.
I have a pretty good hunch what we'll be doing at our next meeting, but I'll refrain from listing anything now. I don't want to have to quote another famous poet to try and cover up for my improper planning again!
-Kressly
VRC 1414's first ever meeting
5.11.11: VRC Team 1414 assembled at my house for the first time this evening. We'll be meeting in the basement for our pilot year. It was great seeing parents at team members (4 UPR veterans from our FLL teams and two rookies). Mitchell, Bryan, Ben, Jonas, Justin, and Casey got to know each other pretty well through an introductory go around, an activity known as "three truths and a lie", and by scripting and executing an introductory video for the UPR Youtube Channel.
Each team member received their safety glasses and binder packed with Inventor's Guide (thanks UPR VP John Niziolek), Engineering Notebook and entry spec sheet, full copy of the VRC Gateway Manual, and vocabulary handout.
I spent a chunk of the meeting going over key concepts we will focus on this year, including the UPR motto of "tachquiwi" (which is Lenape for "together"), professionalism, the fun/learn balance, documenting like you will evaporate (just turned that phrase five minutes before the meeting and I really like it), sharing with the community, iterative design, elegant simplicity, ERB (expected repeatable behavior), and LYD (loving your data).
We also unpacked all of our VEX equipment order and got things in proper storage, made our first design notebook entries using the simple "Identify Need/Problem --> Perform Task(s )--> Reflect/Evaluate -->" loop (which they caught onto faster than I thought they would), and watched the Gateway game animation just before calling it a night.
The most important part of the meeting came early on when I went over all of the donors who have funded this start-up (see http://www.uprobotics.org/donors.html), what it meant to have them believe in us so much, and how we could pay them all back with our time, effort, attention ... and respect (which Jonas was quick to point out).
Special thanks to all parents for getting the team members to the meeting promptly and to Mitchell's mom who sent along cupcakes. I have a really positive feeling about how fast this group was able to work together and look forward to seeing their cohesiveness and productivity grow along with their design skills and knowledge. They all left the meeting with homework to read the Gateway manual and to peruse the Inventor's Guide for lessons to learn.
Next meeting in a few weeks - we will concentrate on the brainstorming process, learn about our tools, learn gear ratio, and do some more in depth work with our vocabulary and design notebooks. Look for the student team members to take over and rotate into blog entry duty starting at the next meeting. Getting everyone's perspective here should be a lot of fun.
-Kressly
Subscribe to:
Posts (Atom)